※この記事は下記のブログ記事を英訳したものです。海外からの問い合わせが増えてきたため英訳しました。
- Background
- Preparation
- How to use LINE Login Plugin
- How to use the LINE Message plugin
- Supporting Broadcast (Email sending to multiple people all at once)
Hello everyone! We are thrilled to introduce the new two Plugins of LINE Login and LINE Message developed by NoCode Lab.
- "LINE Login Plugin" that enables to login into LINE with LINE account
- "Line Message Plugin" that enables to send messages from Bubble to LINE
LINE is Japan's largest social network. As of 2020, the number of active users is more than 84 million. In addition to Japan, LINE has grown up as a giant messenger app in South Korea, Indonesia and Taiwan.
Background
To implement LINE login and message sending, there are already a few plugins such as Auth0, but to expedite the process of connection with LINE much easily as well as directly, we developed these plugins and introduce in this blog how it's set!(As you can probably guess, the more services to be integrated, the harder it is to maintain your app.)
blog.nocodelab.jp
blog.nocodelab.jp
Preparation
Plugin installation
Install the two plugins "LINE Login" and "LINE Message" from the Plugins tab. You'd find them when searching with the keyword of "LINE".
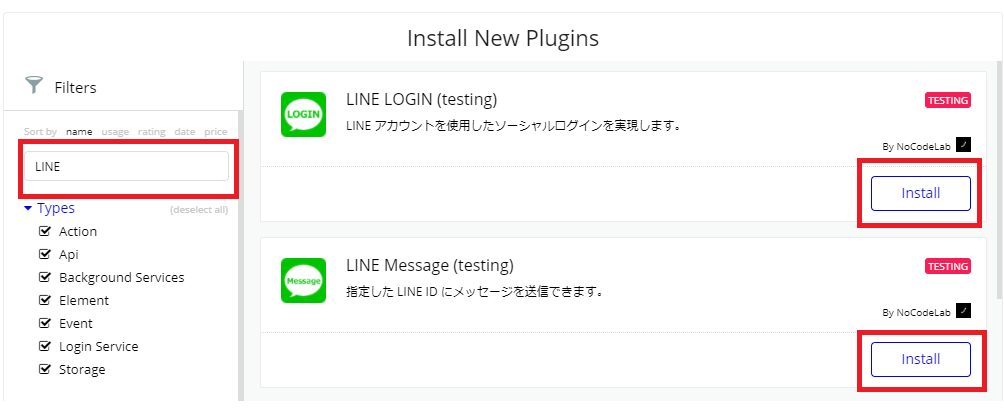
* Please disregard the "TESTING" shown in the picture above. That's only for us
Register to LINE Developers
To begin with, you need to quickly register to LINE Developers. If you already have your account, you can move on to the next step.
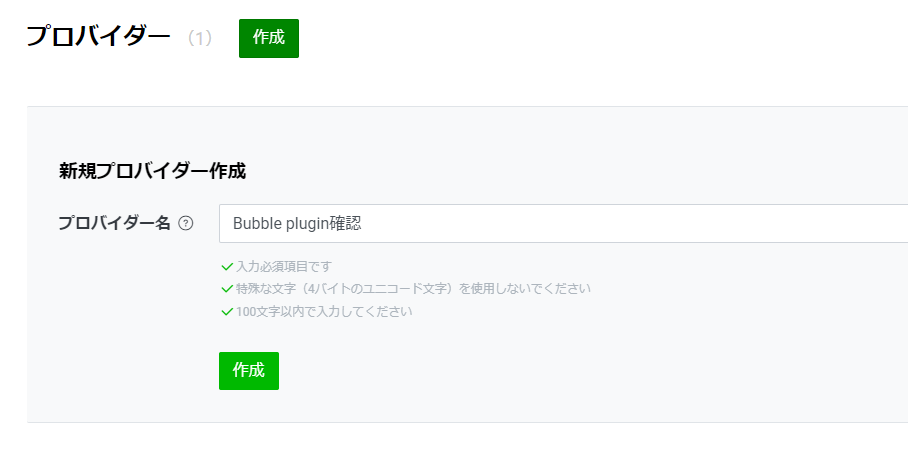
Create a provider channel with LINE Developers
Once you registered to LINE Developers, your next step is to create a provider. Set any provider name whatever you like (personal name, company name, etc).
We set it as "Bubble plugin確認" as below.
Now it's time to create channels. You'll create two channels of "LINE Login" and "Messaging API".
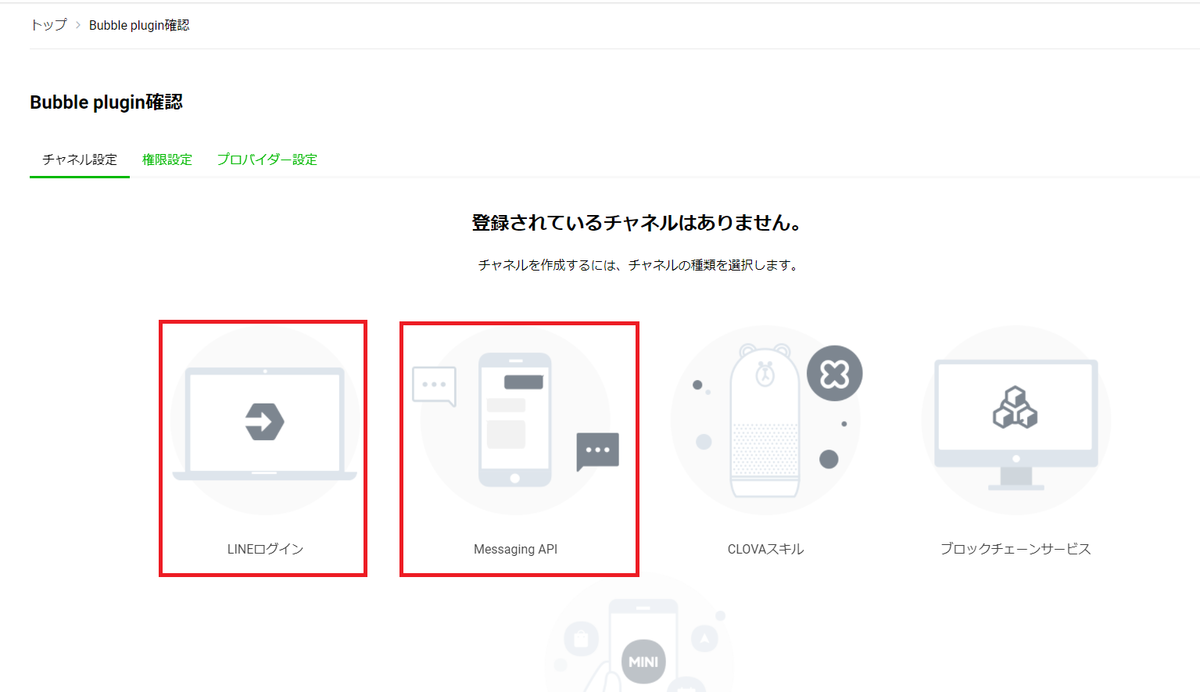
LINE Login
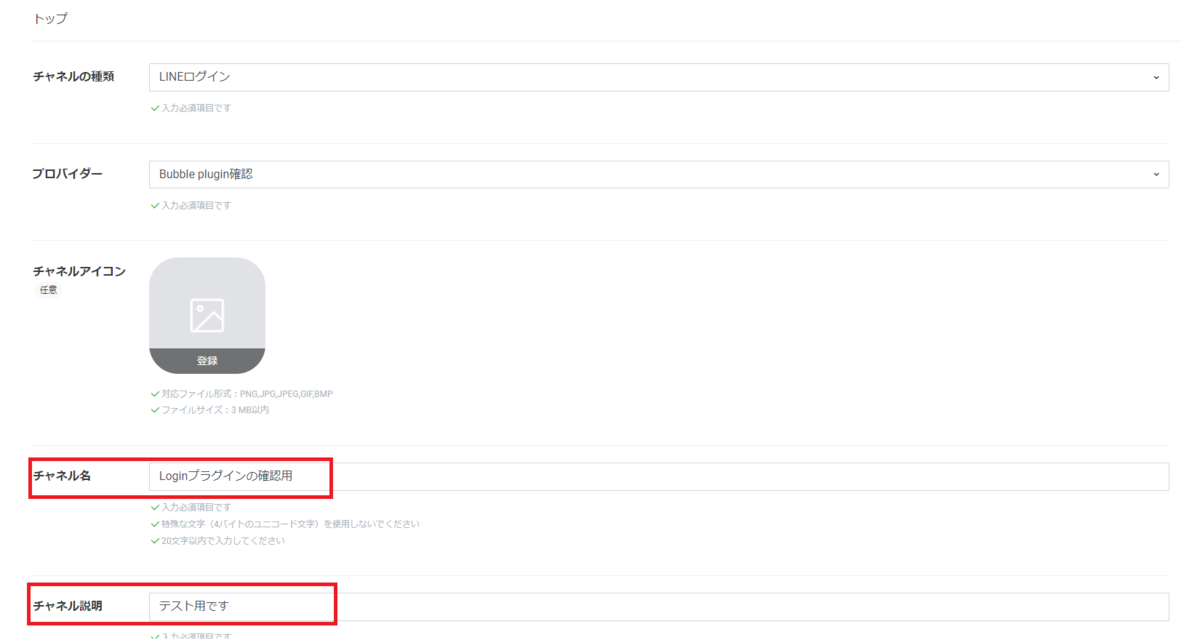
So let's create a LINE Login channel. Items should be set as shown in the table below.
| Item | Settings |
|---|---|
| Channel type | LINE Login |
| Provider | Select the provider name you have created |
| Channel icon | optional |
| Channel name | Input the channel name you have created |
| Channel description | Input the channel description as you like |
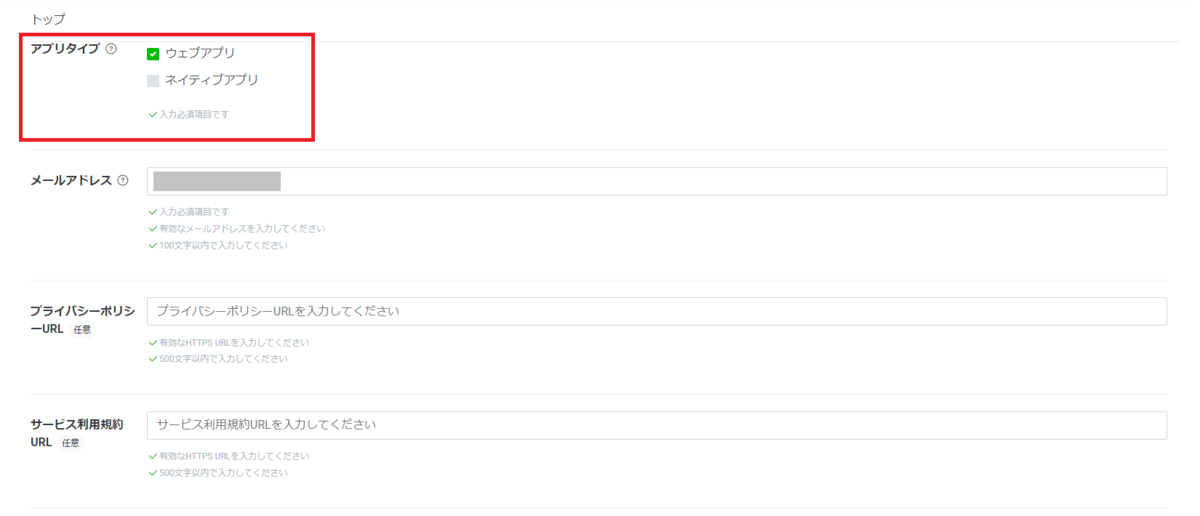
| App types | Select "Web app" |
| Email address | Your email address (Leave it as default) |
| Privacy policy URL | Optional |
| Terms of use URL | Optional |
Just click the checkbox of "I have read and agree to the LINE Developers Agreement" then click "Create" button.
Messaging API
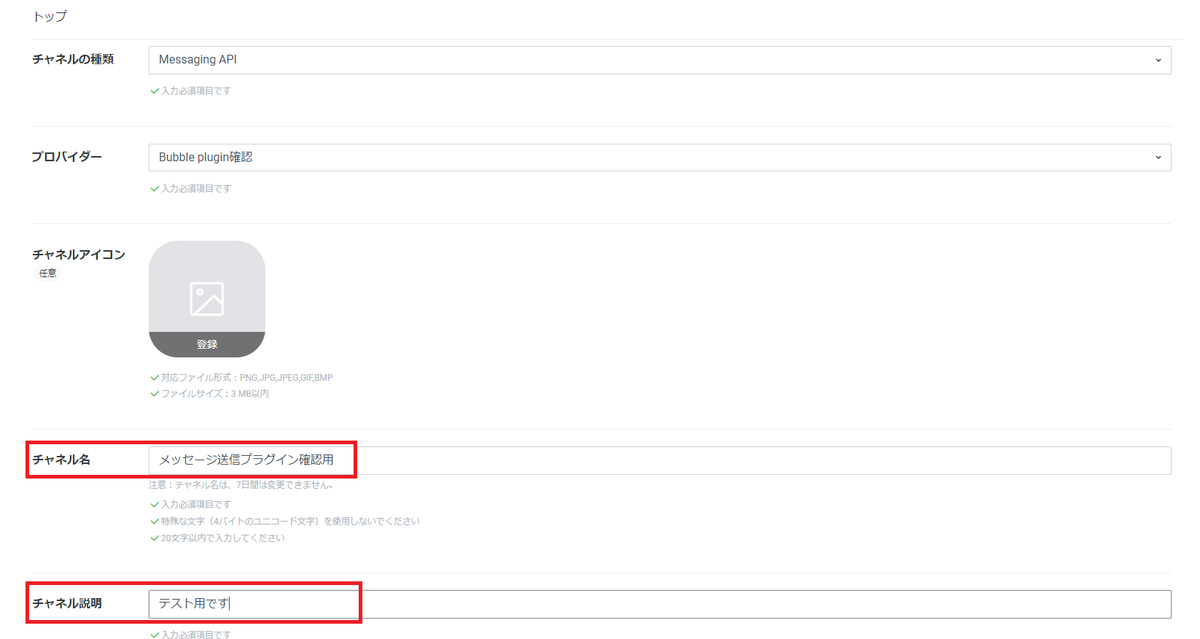
The next step is to create a new Messaging API channel as well. Items should be set as shown in the table below.
| Item | Settings |
|---|---|
| Channel type | LINE Messaging API |
| Provider | Select the provider name you have created |
| Channel icon | optional |
| Channel name | Input the channel name you have created |
| Channel description | Input the channel description as you like |
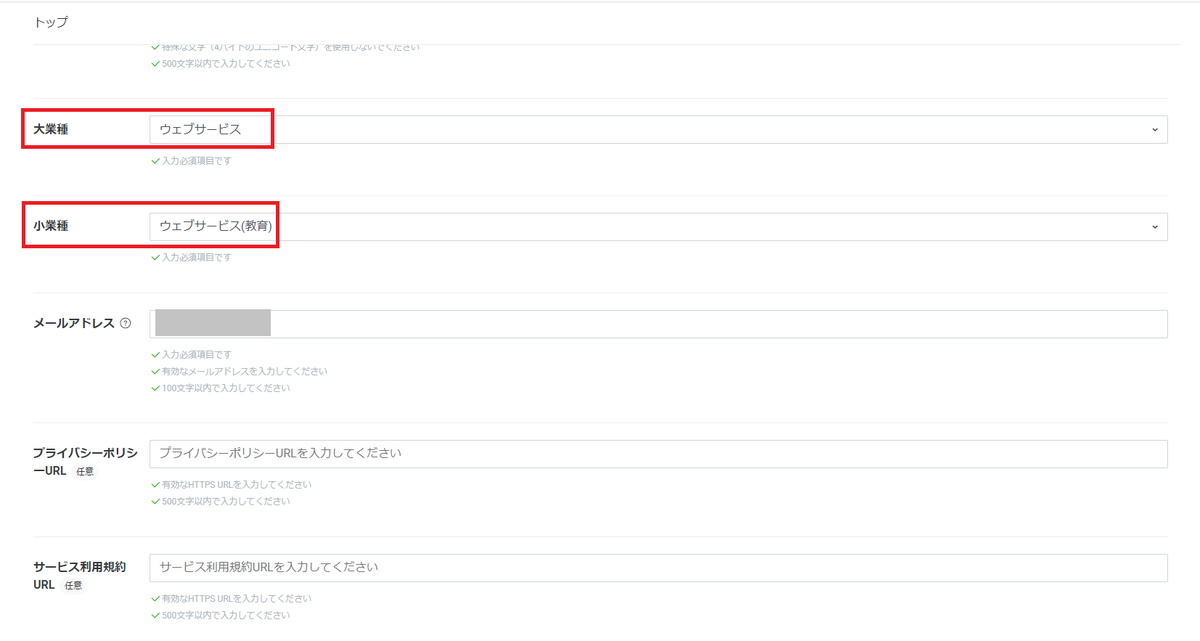
| Category | Select a category from the list |
| Subcategory | Select a subcategory from the list |
| Email address | Your email address (Leave it as default) |
| Privacy policy URL | Optional |
| Terms of use URL | Optional |
Click the checkbox of "I have read and agree to the LINE Official Account Terms of Use" and "I have read and agree to the LINE Official Account API Terms of Use" and click "Create" button.
The plugins are ready to go now.

How to use LINE Login Plugin
Now you need to verify the social login of your LINE account by using LINE Login Plugin.
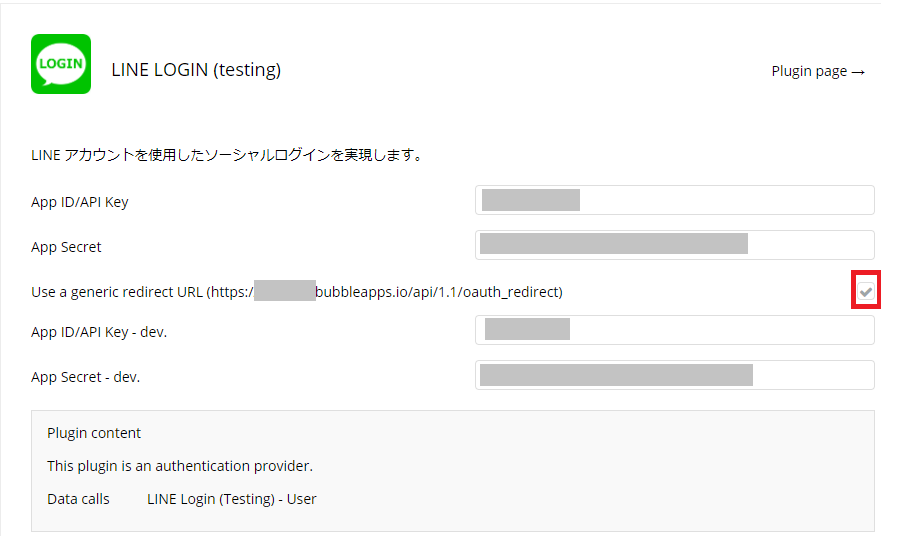
Plugin settings
Select "LINE Login" from the plugins tab on the Bubble app you created, and set values. Please refer to the table below for the details.
| Item | Settings |
|---|---|
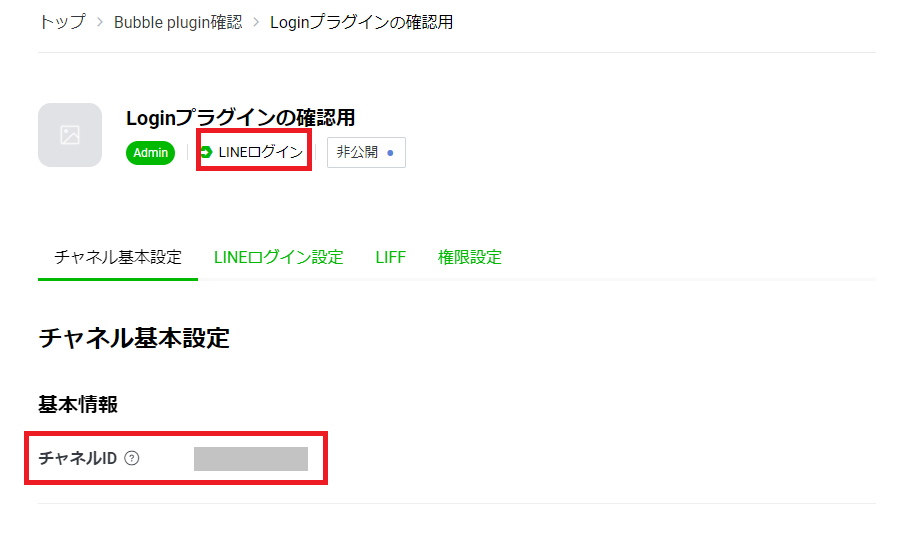
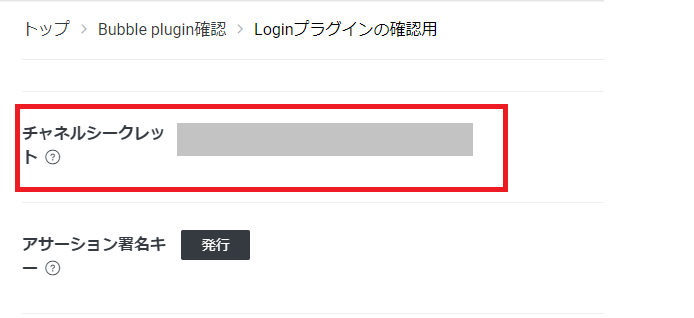
| App ID/API Key | "Channel ID" of the LINE login channel you created |
| App Secret | "Channel Secret" of the LINE login channel created |
| App ID/API Key - dev. | App ID/Same as API Key |
| App Secret - dev. | Same as App Secret |
Then click the checkbox of "Use a generic redirect URL".
Callback URL registration
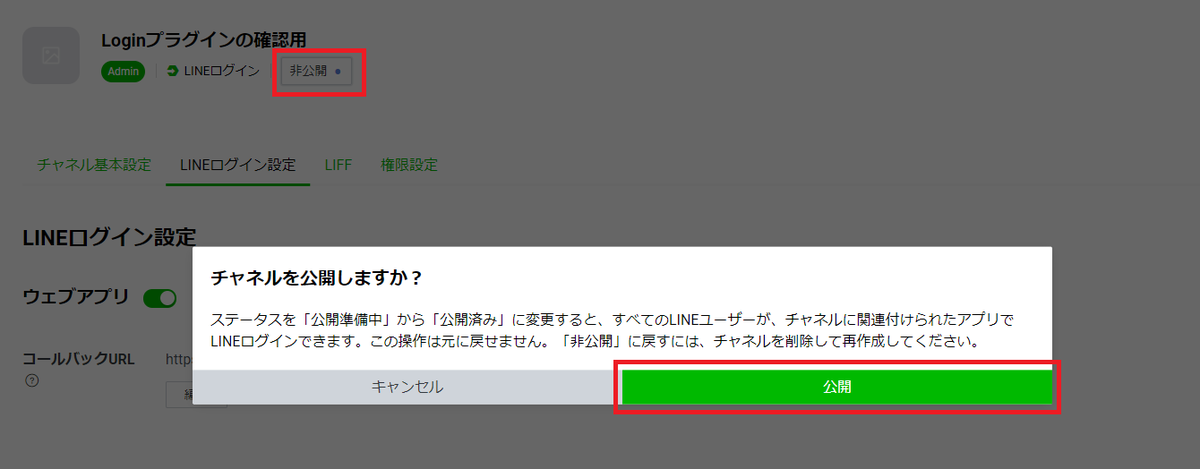
Go to the LINE Developers page, register the callback URL on the tab of "LINE Login Settings" on the "LINE Login" channel you created. The URL to register is going to be "https://{name of the Bubble app you created}.bubbleapps.io/api/1.1/oauth_redirect".

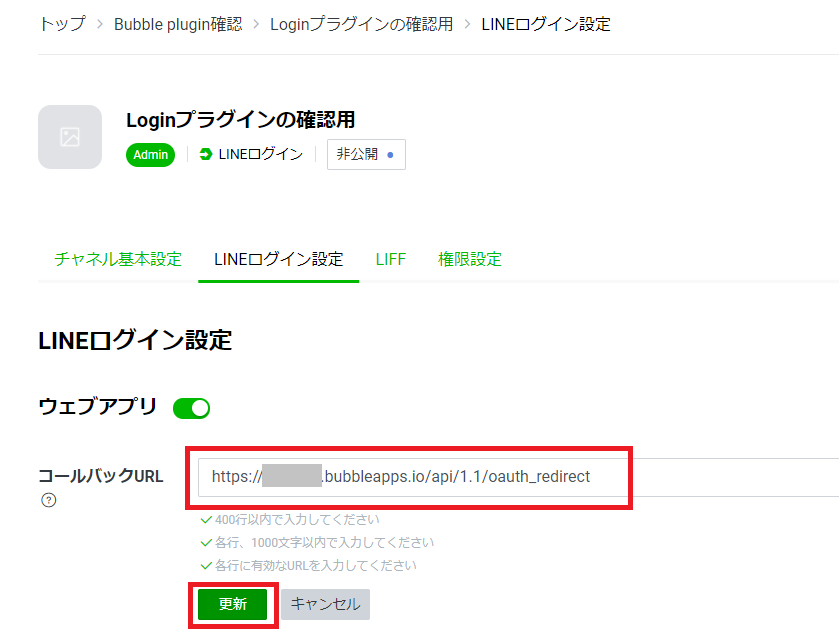
Click the "Update" button. Then change the channel status from "Private" to "Public".
Screen creation
Let's go back to Bubble app. We are going to create an index page to place the "Login" button and a Users page after login.
Index page
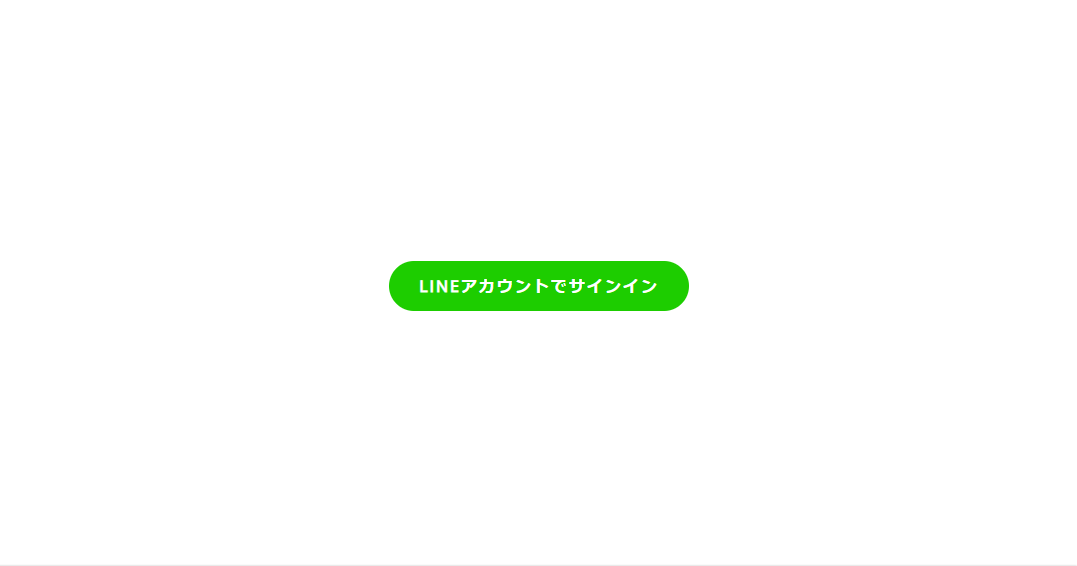
Create a "Sign in with LINE account" Button.

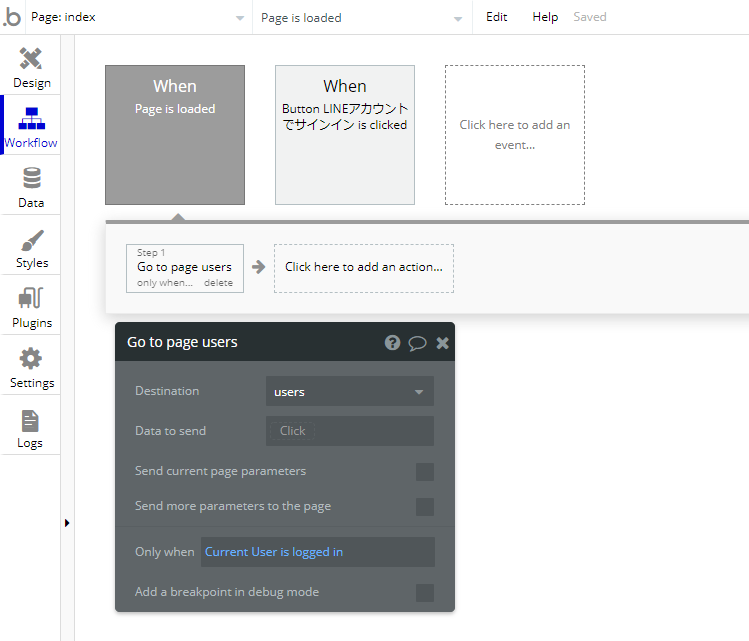
There are two workflows:
- If the user is already logged in when loading the page, the user is taken to the Users page
- If not, the app ask the user to click the "Sign in with LINE account" button and after successful signing in, the user is taken to the Users page.
Set a workflow of "Go to page users" on "When - Page is loaded", the condition "Only when" as "Current User is logged in"
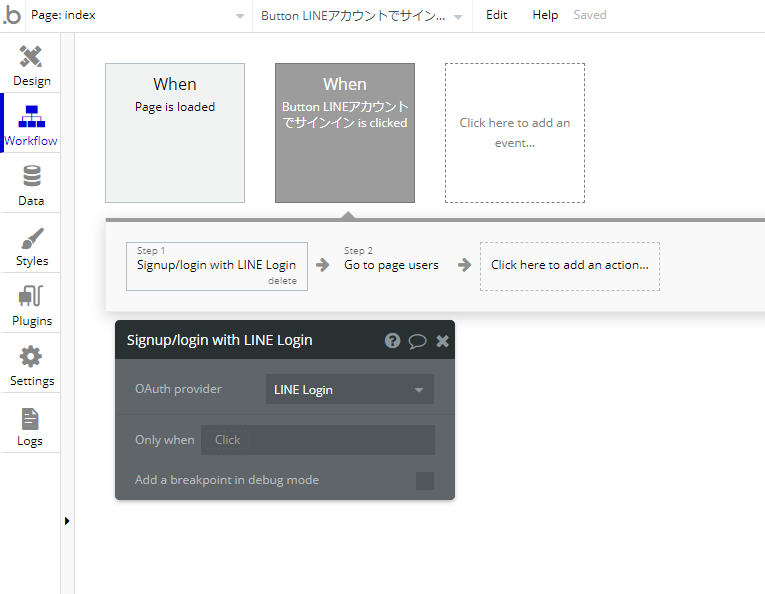
Next, you need to add a workflow of "Sign in with LINE account" button. Select "Sign up / login with a social network" from "Account", and select "Signup/login with LINE Login" for OAuth provider.
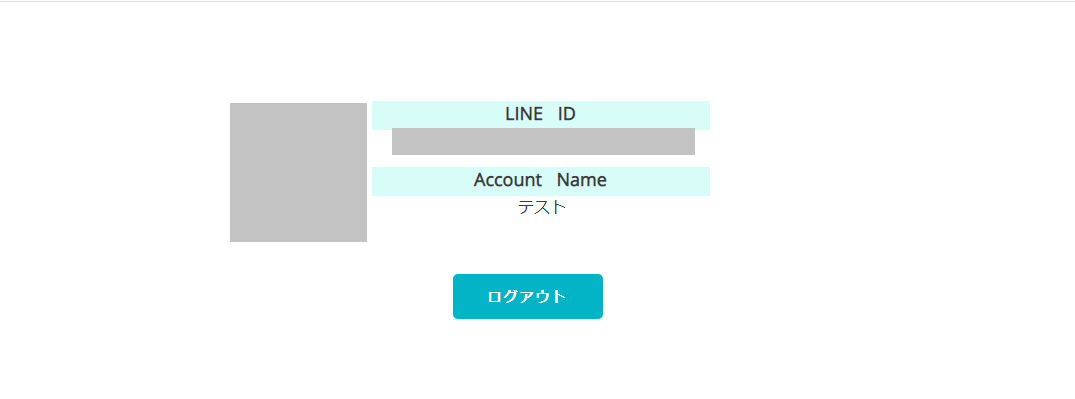
Users page
Let's create a Users screen to transition after login. You need to have LINE icon image, LINE ID, and Account Name displayed on the screen.
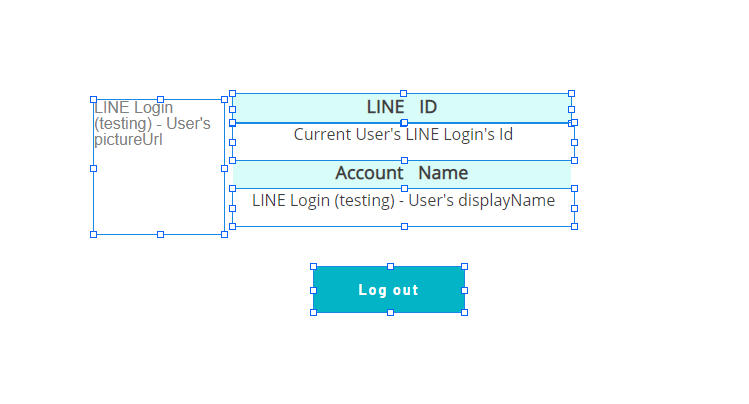
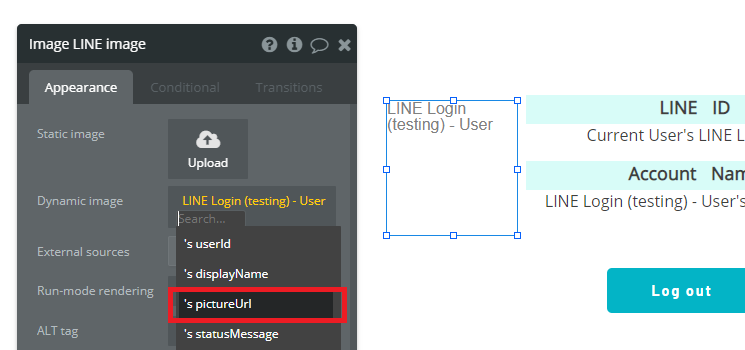
Place an Image element to display the icon image. Select "Get data from an external API" from the Dynamic image, set "LINE Login - User" for the "API provider", and select " 's picture Url" as the return value.

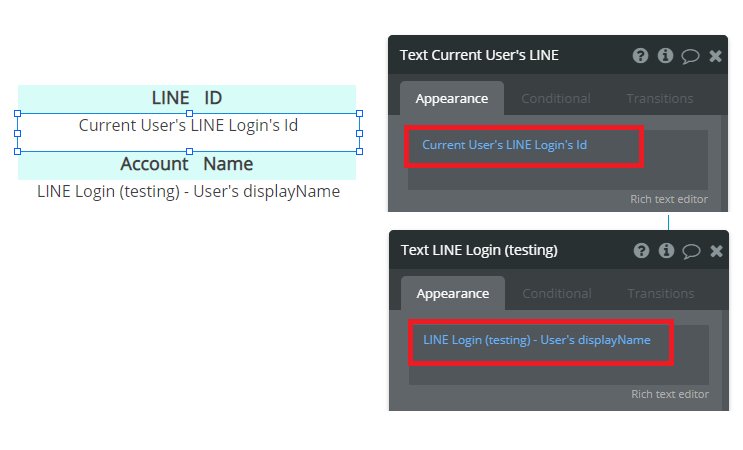
Place a Text element to display the LINE ID. Set value as "Current User's LINE Login's Id".
Then, place another Text element to display the Account Name in the same manner. Select "Get data from an external API" from Insert dynamic data, then set "LINE Login - User" for "API provider", and select " 's display Name" for the return value.
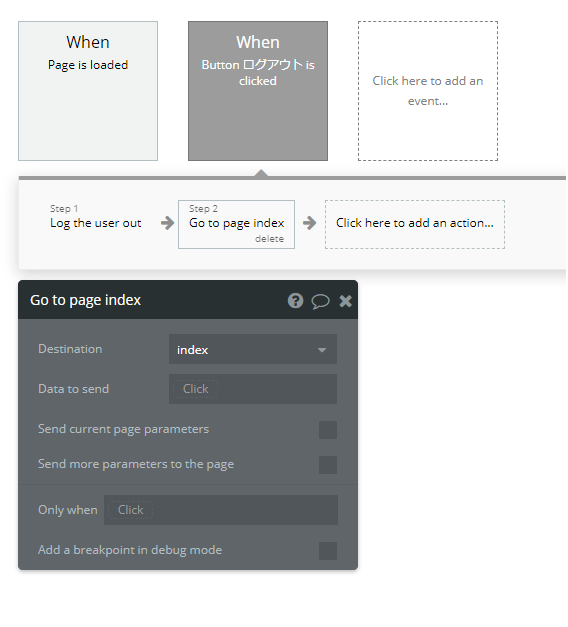
Then place a "Logout" button.
There are two workflows as follows:
- If the user is already logged in when loading the page, the user is taken to the Index page
- When the user clocks the "Logout" button then the user will be logged out and will be taken to the Index page.

Let's check your LINE Login with Preview.
Check with Preview
Press the "Sign in with LINE account" button.
You will be taken to the LINE Login screen.
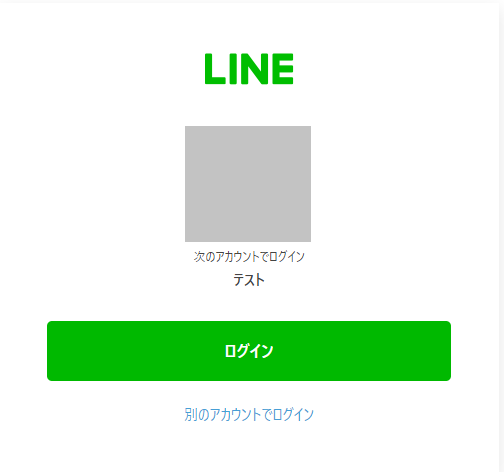
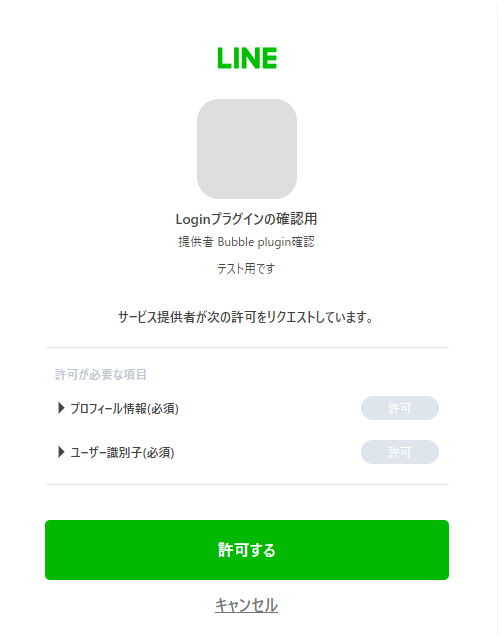
An authentication confirmation below will be displayed only when visiting for the first time.
Once you log in, you are going to be taken to the Users page and will be able to set an icon, LINE ID, and account name.
How to use the LINE Message plugin
Let's use the LINE Message plugin to send messages from the Bubble app to LINE.
Plugin settings
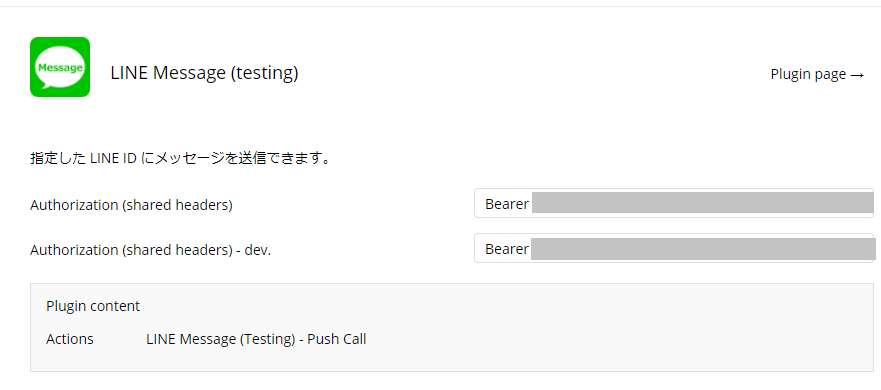
Select "LINE Message" on the tab of Plugins on the Bubble app and set values.
Issue a "Channel Access Token" on the tab of "Messaging API Settings" on the "Messaging API" channel on LINE Developers.

Input "Bearer [+] [half-width space] [+] [channel access token issued]" into "Authorization (shared headers)" and "Authorization (shared headers) - dev".
LINE Friend registration
Register friends to your LINE account by using QR code on the "Messaging API Settings" tab on "Messaging API" channel on LINE Developers otherwise you can't see messages sent from Bubble.

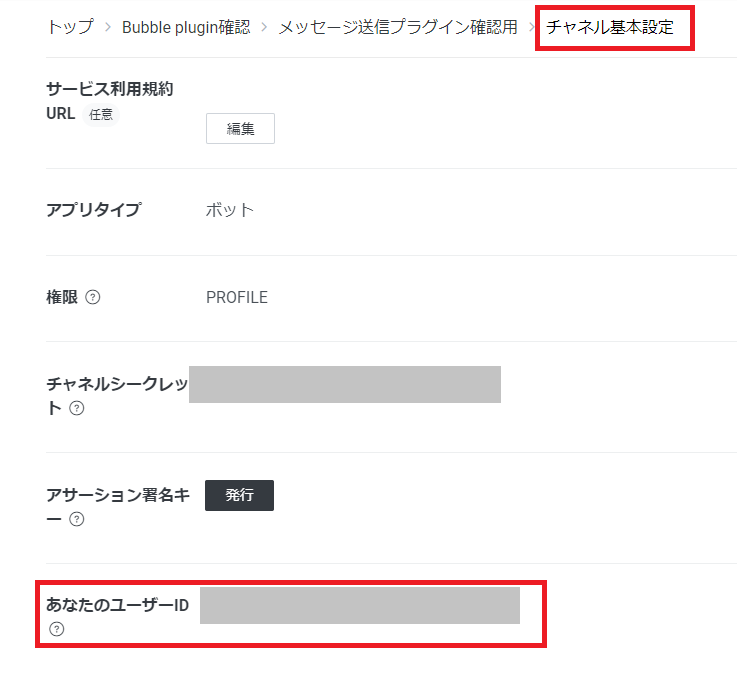
Confirm User ID
Go to the "Messaging API" channel on LINE Developers, check the "LINE account ID" on the tab of "Channel basic settings". It'll be shown as "Your User ID".
You'd better to keep this ID as it will be needed later when setting values upon sending a message.
(Due to the minor change on LINE console, this ID is not shown to the users who newly created LINE account. We will update how to proceed for the developers having this issue.)
Screen creation
Let's go back to the Bubble app and create a function to send messages on the Index page.
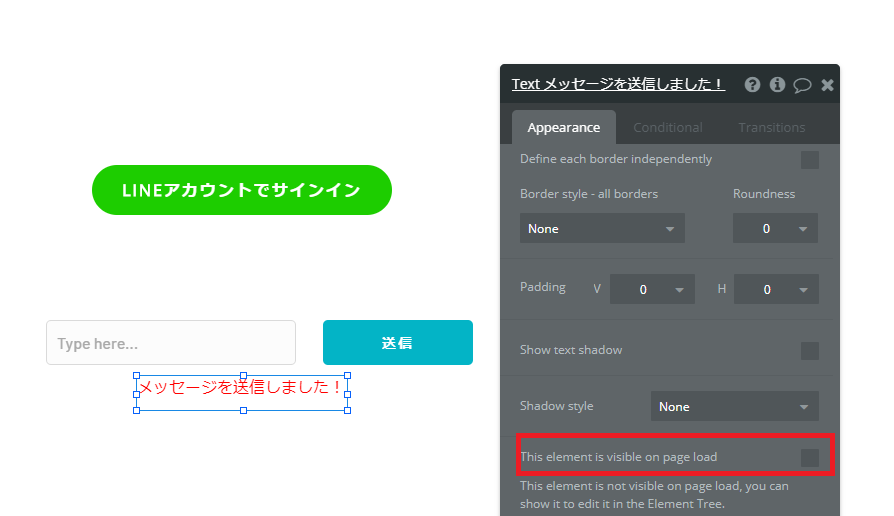
Place an Input form to input a message and place a Button element to create a Submit button. Also prepare a text of "Sent a message!" so that the completion of the transmission can be recognized. It will not be displayed when the page is loaded, so uncheck "This element is visible on page load".
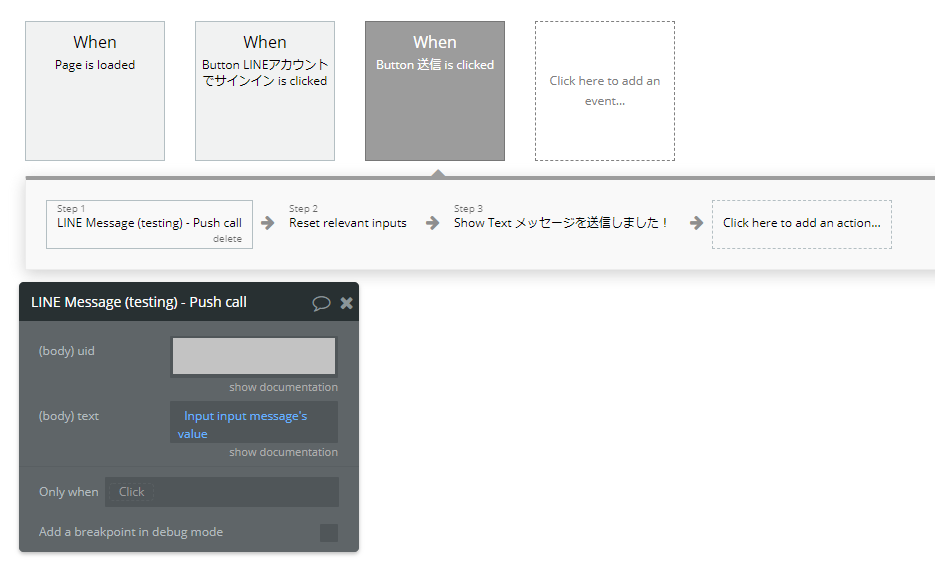
Add a workflow to send a message when you click the Send button.
Select "Line Message - Push call" from Plugin. Input User ID into "(body)uid". And set "Input input message's value" into "(body)text".
After sending the message, you need to clear the input values and to display the "Completed" message.
Preparation for LINE Message confirmation is all set!
Check your app with Preview
Input a message and click the Send button.

You may be able to see "Successfully sent" message.

Then you will also be able to see the message on LINE

- Please be aware that the number of messages you can send each month by Messaging API with the LINE Developers free plan is limited up to 1000.
Supporting Broadcast (Email sending to multiple people all at once)
(Added on 2020/10/24)
ラボさんのLINE配信プラグイン
— けい🐭ノーコードbubble専門エンジニア/開発アドバイザ (@NoCoder_K) 2020年10月24日
https ://api.line.me/v2/bot/profile/ + user_id
を叩いてると思うんだけど、一斉配信したければAPI connectorで
https: //api.line.me/v2/bot/message/broadcast
をPOSTで叩けばできるので必要な方は参考にどうぞ pic.twitter.com/MG9Orz5R7B
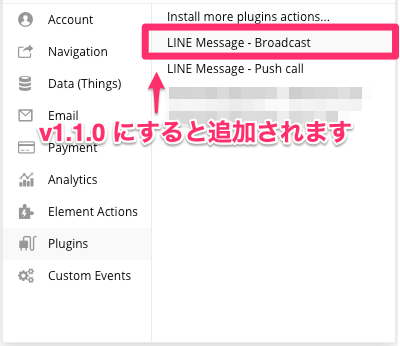
The LINE Message Plugin v1.1.0 started supporting Broadcast.
You can send messages to all your "friend" all at once.
Please be careful that it will be sent to all your "friends" regardless of whether they are registered on Bubble or not.
How to use Broadcast
Select "LINE Message - Broadcast" which should have been added to "Action". (Please make sure the version is 1.1.0)
Input a message in the text field that you want to send to "friends" all at once.

If you have any questions or suggestions about this article feel free to post a comment below!