
※この記事は下記のブログ記事をChatGPT4を使用して翻訳したものです。海外からの問い合わせが増えてきたため英訳版をお届けします。
This article is a translation using ChatGPT-4 of the following blog post. We are providing an English version due to the increasing inquiries from overseas.
- 1. Introduction
- 2. Overview of LINE LOGIN PRO
- 3. About LINE Developers Setup
- 4. About LINE LOGIN PRO Settings and Features
- Conclusion
1. Introduction
Hello, everyone! In this article, we are excited to introduce a new LINE plugin for NoCodeLab, which can be used with Bubble.
In Japan, the LINE app is widely used by many people and has become a part of everyday life. Initially starting as a platform for chatting and exchanging stickers with friends, LINE has now evolved to offer a wide range of functions for both business and private communication, including payment services.
In the past, NoCodeLab has developed plugins for social login and message sending using LINE accounts, which you can find here. This time, we have created "LINE LOGIN PRO," a new feature that allows users to log in using the email address registered with their LINE account.
Furthermore, this plugin covers all the APIs of LINE Login v2.1, which are available at the time of writing. In addition to retrieving email addresses, it includes features for preventing unauthorized code interception attacks as part of the OAuth2.0 extension specification, PKCE (Proof Key for Code Exchange). It also allows for various settings, such as forcibly displaying the consent screen even if the user has already granted all requested permissions and changing the bot_prompt setting to display the option to add friends.
While it is a paid plugin, we recommend "LINE LOGIN PRO" for those considering promotions using email addresses or looking for a new login system!
2. Overview of LINE LOGIN PRO
This plugin enables login to web applications using the email address associated with a LINE account.
Normally, users need to enter information in multiple fields to create a new account. However, since a LINE account already has user information associated with it, using LINE LOGIN PRO simplifies the process. Users can bypass the tedious information entry and easily log in with a single click, without needing a password.
Note that this plugin does not use the User Agent Flow of the Bubble API Connector to accommodate the LINE Login v2.1 API. It is a separate series from the existing LINE LOGIN and LINE LOGIN aggressive, and users already linked with these will be treated as different users. Therefore, those considering replacing their plugin should note that re-linking will be necessary.
For a demo application, please refer to the following URL for implementation guidance:
3. About LINE Developers Setup
To implement LINE LOGIN PRO, you need to configure LINE Developers as a preliminary step. If you're planning to integrate LINE, please check the following three items.
3.1. Creating a Provider and Channel
Create a provider and LINE login channel on the LINE Developers console screen.
For detailed instructions on creating a provider and channel, refer to the previous article on "Creating a Provider and Channel in LINE Developers."
3.2. Applying for Email Address Retrieval Permission
To use LINE LOGIN PRO, you must apply for email address retrieval permission on the LINE Developers side. Please make this application in the channel basic settings screen.
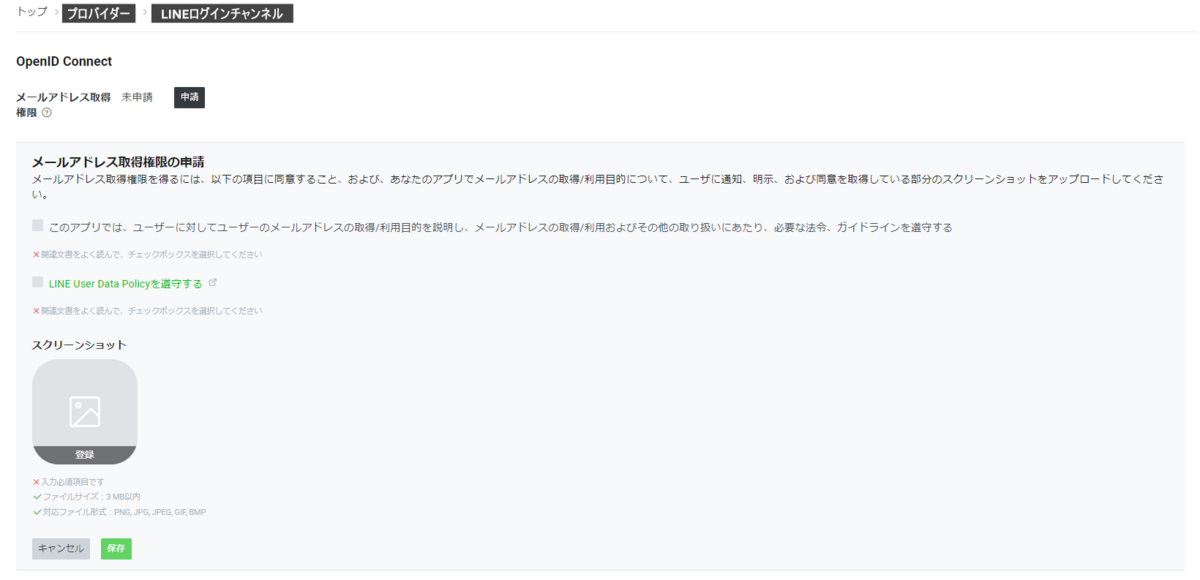
Once the application is complete, you will see a status indicating 'Applied.'

3.3. Setting up Callback and Channel Publication
In the 'LINE Login Settings' tab, turn on the toggle for 'Use LINE Login for Web Apps' and set the callback URL. The URL should be the Bubble side page to which you return after LINE authentication (the page where the login button is placed). For samples, please refer to 'Section 4.3. Specific Implementation Methods' in this article.
Also, update the publication setting from 'Private' to 'Published' to enable the connection from Bubble to the LINE platform.

4. About LINE LOGIN PRO Settings and Features
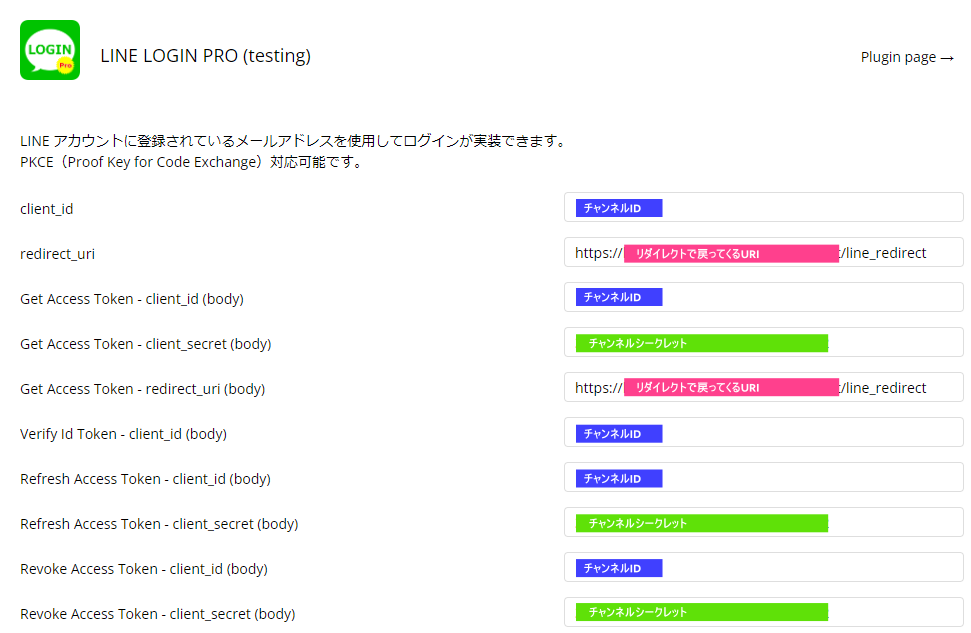
4.1. Configuration Values
For each item of the plugin, set the 'Channel ID' and 'Channel Secret' obtained from LINE Developers. Ensure the redirect_uri is set to the same value as the callback URL set in LINE Developers.
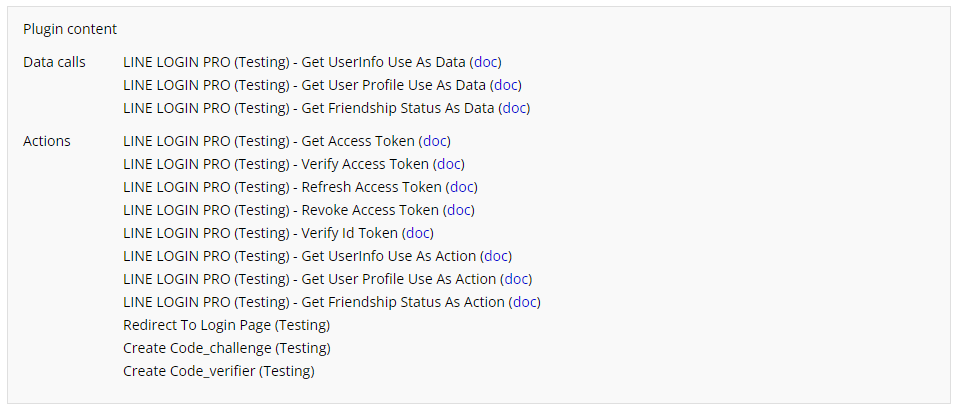
4.2. Supported Features
LINE LOGIN PRO supports the following Data calls and Actions:
Redirect to Login Page
This initiates the authentication and authorization process between the Bubble app and LINE.
For example, if you set 'aggressive' in the bot_prompt field of the Redirect to Login Page action, it will display the option to add the LINE official account as a friend at the time of user login. By setting a value generated by the Create Code_challenge action in the code_challenge field and 'S256' in the code_challenge_method field, you can implement a login compatible with PKCE.
The detailed settings are as follows:
| Setting Item | Type | Required | Description |
|---|---|---|---|
| state | String | Optional | A unique alphanumeric string for preventing Cross-site request forgery (CSRF). Specify this if you want to verify that this value matches the state parameter added to the authorization URL (recommended). If not specified, a string generated within the plugin will be used. |
| prompt | String | Optional | Specifying consent forces the consent screen to be displayed, even if the user has already granted all requested permissions. |
| max_age | Number | Optional | The maximum elapsed time (in seconds) allowed after user authentication. |
| ui_locales | String | Optional | The display language and characters of the screen shown during LINE login. Example: jp-JP |
| bot_prompt | String | Optional | Specify either normal or aggressive. |
| initial_amr_display | String | Optional | Specifying lineqr displays QR code login by default, instead of email address login. |
| switch_amr | Boolean | Optional | Specifying false hides the buttons for changing the login method, such as 'Login with Email Address' or 'QR Code Login'. Default value: true |
| disable_auto_login | Boolean | Optional | Specifying true disables automatic login. Default value: false |
| code_challenge | String | Optional | A parameter necessary for PKCE compatibility. Can be generated with the 'Create Code_challenge' action. |
| code_challenge_method | String | Optional | A parameter necessary for PKCE compatibility. Use S256. |
After the user's authentication and authorization are complete, the following query parameters are added to the callback URL:
| Parameter | Type | Description |
|---|---|---|
| code | String | The authorization code needed to obtain the access token. |
| state | String | The value of the state parameter added to the authorization URL. |
| friendship_status_changed | Boolean | Indicates the relationship between the user and the linked LINE official account. Returned only if bot_prompt is specified and the user is presented with the option to add the LINE official account as a friend at login. |
The return value of the Redirect to Login Page action is the authorization URL.
| Return Value Name | Type | Description |
|---|---|---|
| authorize_url | text | The authorization URL on the LINE platform. |
Create Code_verifier
Generates a unique code_verifier required for PKCE when the user executes LINE login. The generated code_verifier can be obtained as the result of the action.
Create Code_challenge
Uses the generated code_verifier to create a code_challenge necessary for PKCE. The generated code_challenge can also be retrieved as the result of the action.
| Setting Item | Type | Required | Description |
|---|---|---|---|
| code_verifier | String | Yes | The value obtained from the Create Code_verifier action. |
Get Access Token
Uses the authorization code (specified in the query parameter code) received from the LINE platform to issue an access token.
| Setting Item | Type | Required | Description |
|---|---|---|---|
| code | String | Yes | The authorization code received from the LINE platform. Can be obtained from the code parameter in Get data from page URL. |
| code_verifier | String | Optional | A parameter necessary for PKCE compatibility. The value generated at the time of login by the Create Code_verifier action. |
The response includes the following information with status code 200:
| Return Value | Type | Description |
|---|---|---|
| access_token | String | Access token |
| token_type | String | Bearer token type |
| refresh_token | String | Refresh token |
| expires_in | Number | Seconds until the access token expires |
| scope | String | Permissions granted to the access token |
| id_token | String | ID token |
Verify Access Token
Verifies the validity of the access token issued by the LINE platform.
| Setting Item | Type | Required | Description |
|---|---|---|---|
| access_token | String | Yes | Access token |
If the access token is valid, the response includes the following information with status code 200 OK:
| Return Value | Type | Description |
|---|---|---|
| client_id | String | Channel ID that issued the access token |
| expires_in | Number | Seconds until the access token expires |
| scope | String | Permissions granted to the access token |
Refresh Access Token
Uses the refresh token to obtain a new access token.
| Setting Item | Type | Required | Description |
|---|---|---|---|
| refresh_token | String | Yes | Refresh token |
Upon successful refresh of the access token, the response includes the following information:
| Return Value | Type | Description |
|---|---|---|
| access_token | String | Access token |
| token_type | String | Bearer token type |
| refresh_token | String | Refresh token |
| expires_in | Number | Seconds until the access token expires |
| scope | String | Permissions granted to the access token |
Revoke Access Token
Invalidates the user's access token.
| Setting Item | Type | Required | Description |
|---|---|---|---|
| access_token | String | Yes | Access token |
If the invalidation is successful, a status code 200 and an empty response body are returned.
Verify Id Token
Uses the id_token obtained from Get Access Token to verify the ID token and retrieve the user's LINE ID and email address.
| Setting Item | Type | Required | Description |
|---|---|---|---|
| id_token | String | Yes | ID token |
Upon successful verification of the ID token, the following information is obtained:
| Return Value | Type | Description |
|---|---|---|
| iss | String | URL where the ID token was generated |
| sub | String | Target LINE ID for the ID token |
| aud | String | Channel ID |
| exp | Number | Expiration time of the ID token (UNIX time) |
| iat | Number | Time when the ID token was generated (UNIX time) |
| auth_time | Number | User authentication time (UNIX time), only if the max_age value was specified in the authorization request |
| nonce | String | The nonce value specified in the authorization URL |
| amr | String | List of authentication methods used by the user |
| name | String | User's display name |
| picture | String | User's profile picture URL |
| String | User's email address |
Get UserInfo (Data call & Action)
Retrieves the user's LINE ID, display name, and profile picture.
| Setting Item | Type | Required | Description |
|---|---|---|---|
| Authorization | String | Yes | Bearer {access token} |
The response includes the following information:
| Return Value | Type | Description |
|---|---|---|
| sub | String | LINE ID |
| name | String | User's display name |
| picture | String | User's profile picture URL |
Get User Profile (Data call & Action)
Retrieves the user's user ID, display name, profile picture, and status message, if set.
| Setting Item | Type | Required | Description |
|---|---|---|---|
| Authorization | String | Yes | Bearer {access token} |
The response includes the following information:
| Return Value | Type | Description |
|---|---|---|
| userId | String | LINE ID |
| displayName | String | User's display name |
| pictureUrl | String | User's profile picture URL |
| statusMessage | String | Status message, only if set by the user. |
Get Friendship Status (Data call & Action)
Retrieves the friendship status between the user and the LINE official account linked to the LINE login channel.
| Setting Item | Type | Required | Description |
|---|---|---|---|
| Authorization | String | Yes | Bearer {access token} |
The response includes the following information:
| Return Value | Type | Description |
|---|---|---|
| friendFlag | Boolean | true: The user has added the LINE official account as a friend and is not blocked. false: Otherwise. |
4.3. Specific Implementation Method
Let's implement LINE login using the plugin in practice.
The demo app is available at the following URL: bubble.io
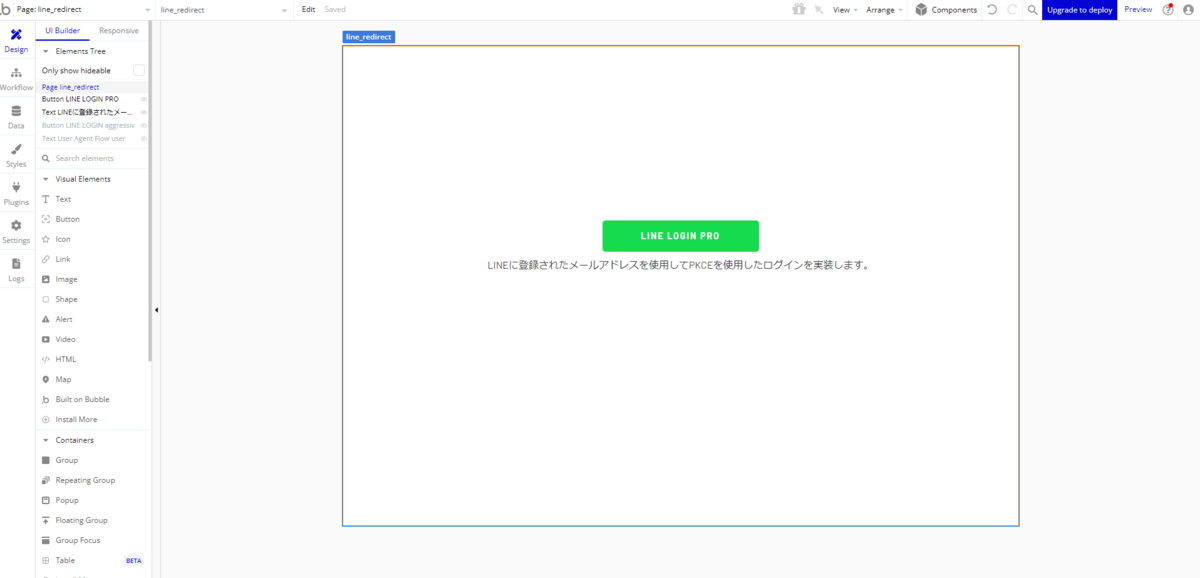
This time, we will create a page named 'line_redirect' where the login button will be placed and a page named 'line_index' intended for members only.
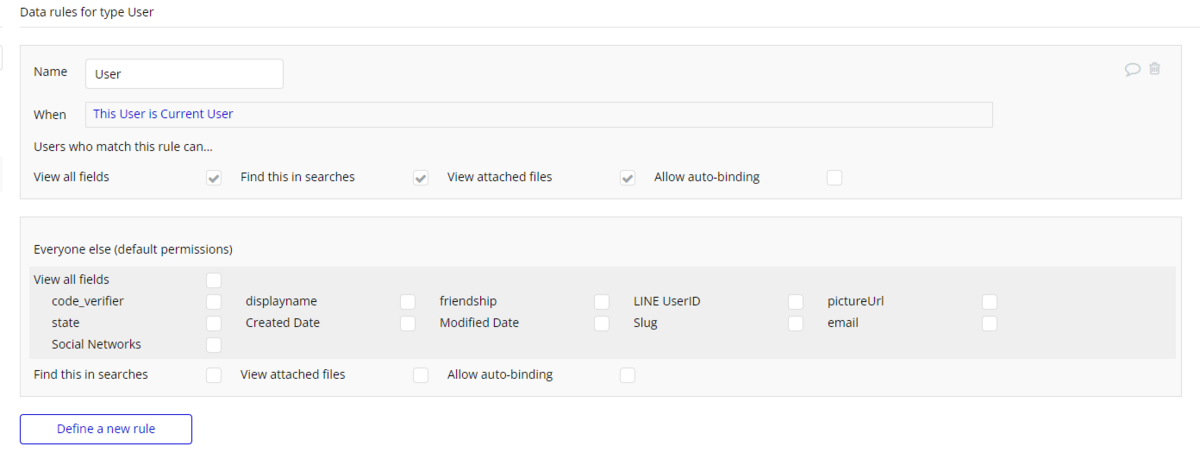
In the database's User type, we create fields to store LINE IDs, icons, usernames, etc., received from the LINE platform. The fields for code_verifier and state are for saving parameter values necessary during authentication.
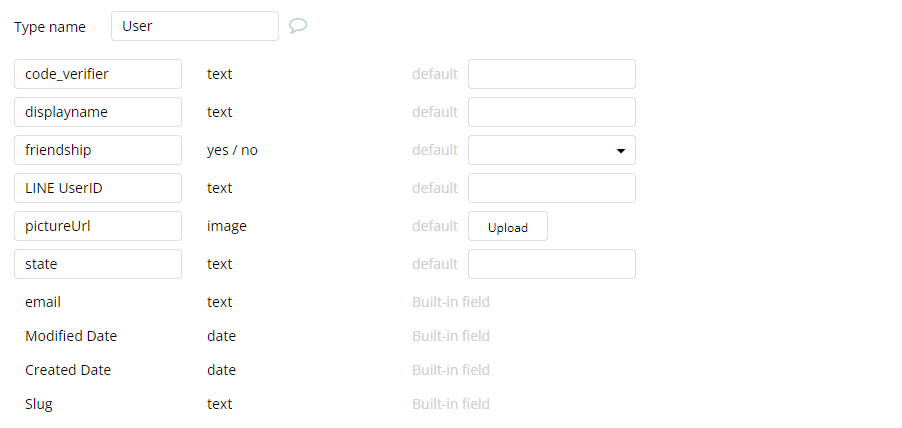
Ensure to apply appropriate Privacy Rules to the User type.
Create a page named 'line_redirect' and place the login button there. This page will be specified as the callback URL in LINE Developers and the redirect_uri in the plugin.
The image below shows the PKCE-compatible actions executed when the authentication button placed on the page is clicked.
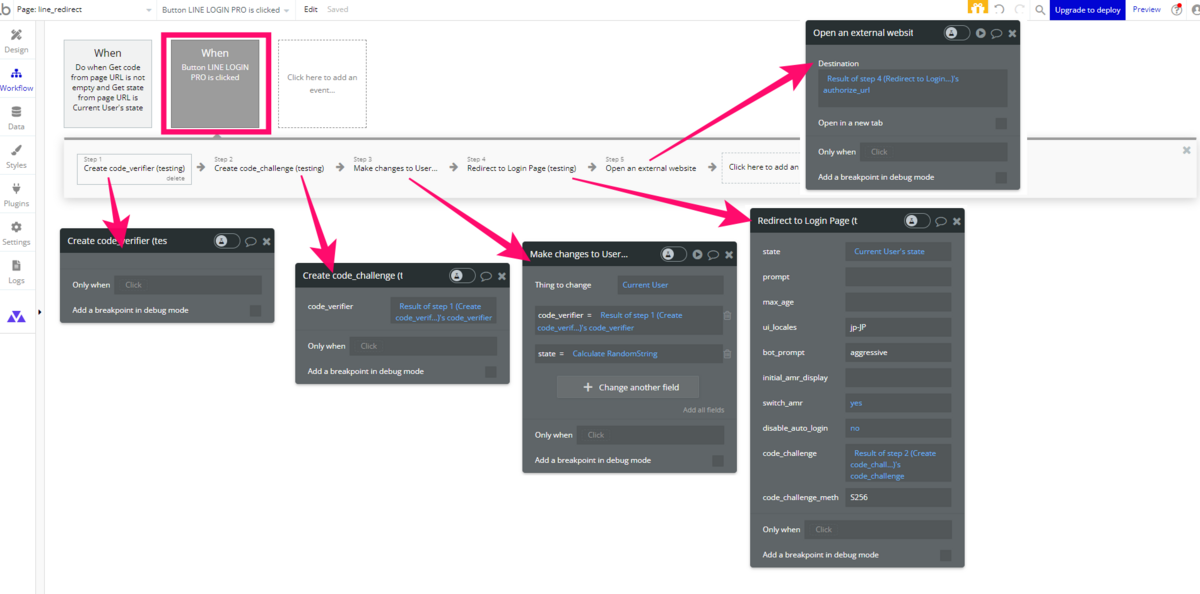
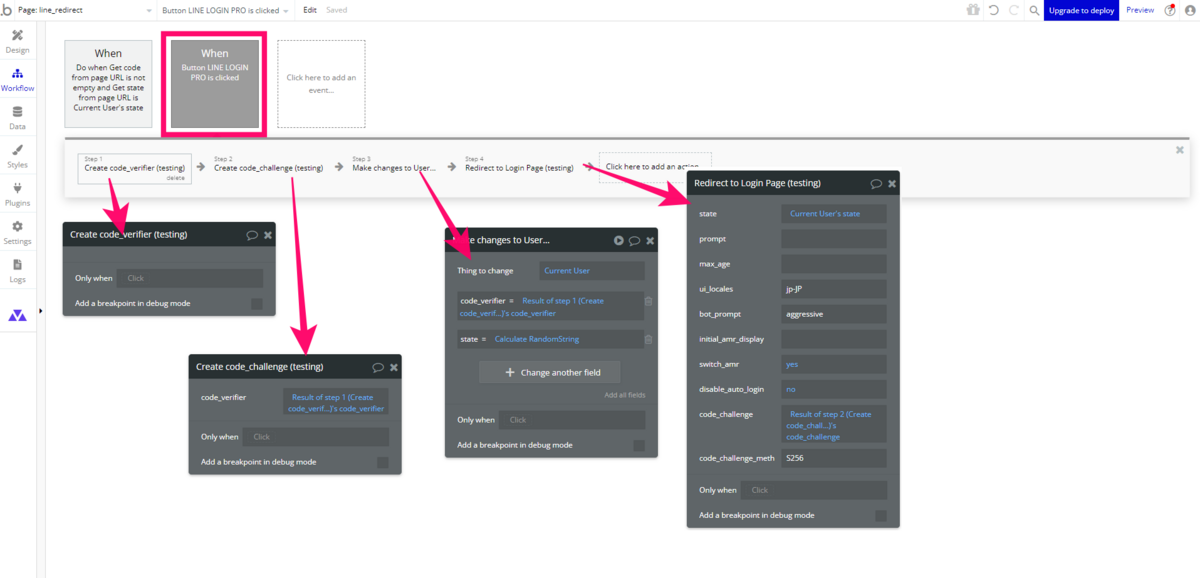
Step1: Execute the 'Create code_verifire' action of the plugin to generate a code_verifire.
Step2: Call the 'Create code_challenge' action of the plugin, specify the code_verifire from Step1, and generate a code_challenge.
Step3: Update the code_verifire and state fields of the Current User and save these values. Use the code_verifire from Step2 for the code_verifire, and generate a random alphanumeric string using 'Generate random string' in Calculate formula for the state.
Step4: Execute the 'Redirect to Login Page' action of the plugin. Set the state to the state generated in Step3 for the Current User, the code_challenge to the one generated in Step2, and 'S256' for the code_challenge_method. Configure other items as you prefer.
Step5: Navigate to the URL issued by the 'Redirect to Login Page' action in Step4.
Next, when the user's authentication and authorization are completed, the LINE platform redirects to the callback URL (i.e., line_redirect) with query parameters. Use these parameters received on the Bubble side to implement the login process.
The condition for triggering the event is set to when the code is specified in the page's query parameters, and the state matches the Current User's state. If these conditions are met, issue the token and proceed with the login process. (Depending on the app's specifications, further conditions may be needed. Please set them as necessary.)
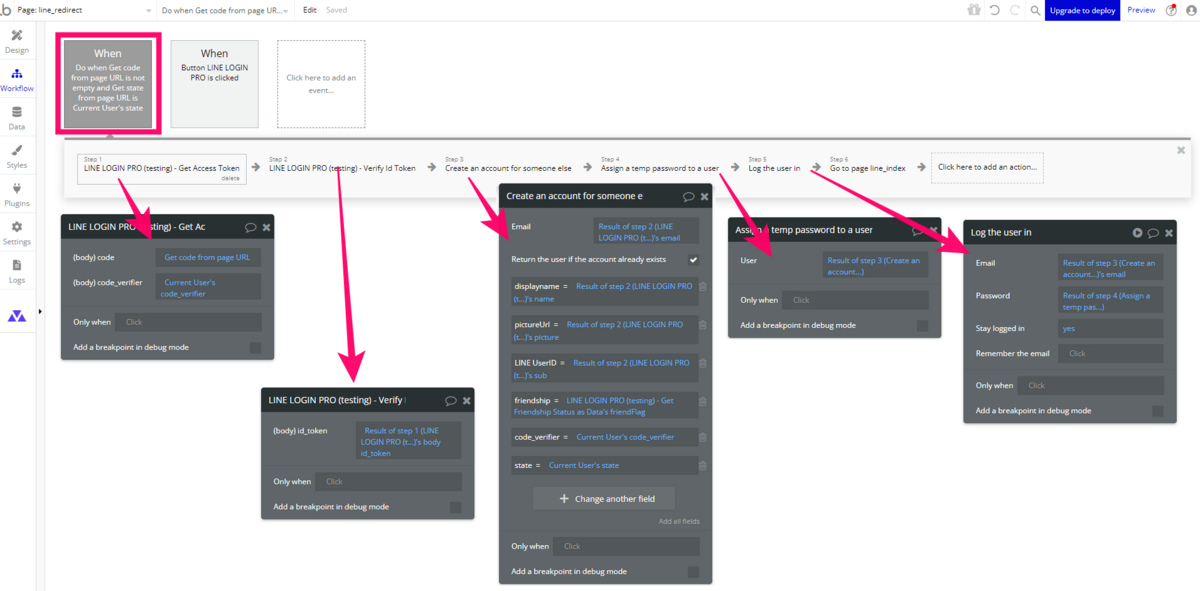
Step1: Execute the 'Get Access Token' action of the plugin to obtain an access token. Set and use the code received in the query parameters and the value saved in Current User's code_verifire.
Step2: Receive the id_token from the response of Step1 and verify the ID token using the plugin's 'Verify Id Token'.
Step3: Create an account using 'Create an account for someone else'. Ensure to check 'Return the user if the account already exists' so that a new User type is not created for existing users. Also, set the user information received in Step2 in the User type fields.
Step4: Assign a temporary password generated by 'Assign a temp password to a user' to the User created in Step3.
Step5: Log the user in using the email address received from LINE and the password generated in Step4.
Step6: After logging in, set to navigate to a user-specific page (here, 'line_index').
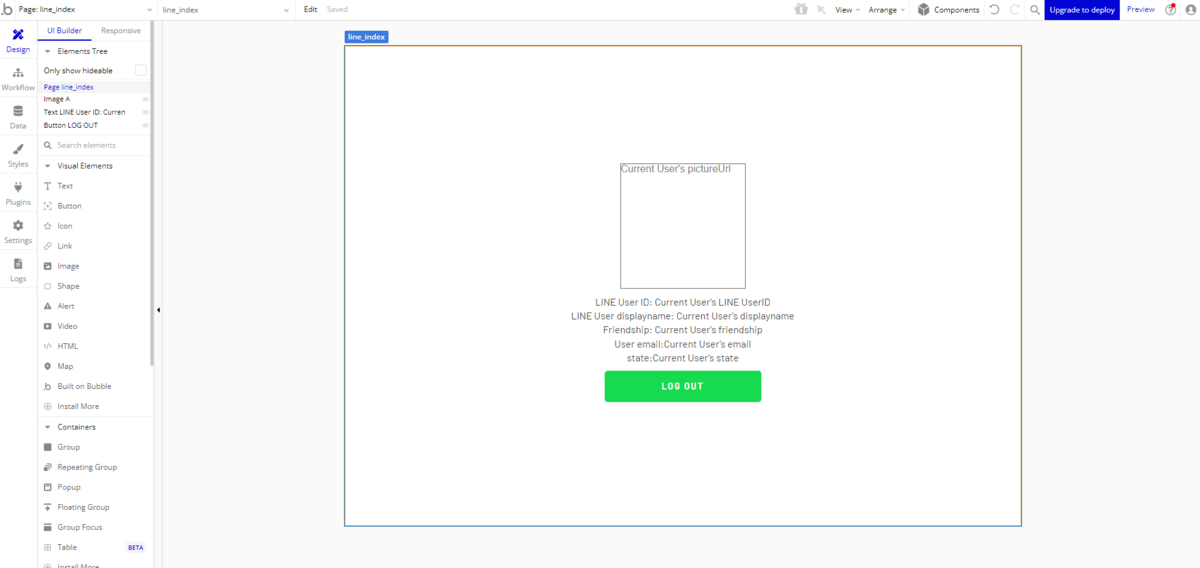
Finally, prepare the 'line_index' page to transition to after successful LINE login. Check if the necessary information is correctly set after LINE login.
Conclusion
This time, we introduced the new plugin 'LINE LOGIN PRO' from NoCodeLab!
By installing LINE LOGIN PRO in Bubble, it has become possible to implement more flexible LINE logins! If you want to provide a seamless login experience to your users, be sure to try it out!
Translated by ChatGPT-4